Learn how to configure screens by adding fields, spaces, labels, and warnings.
Overview
Bitfocus creates and maintains screens that we make available to all customers. These screens, which are called "System" screens, collect common data such as the HUD HMIS Data Elements.
System administrators can't edit System screens, but they can copy them to create custom screens. System Administrators can also create custom screens from scratch.
Accessing Screens
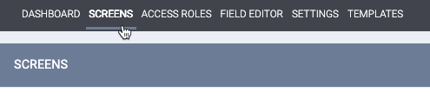
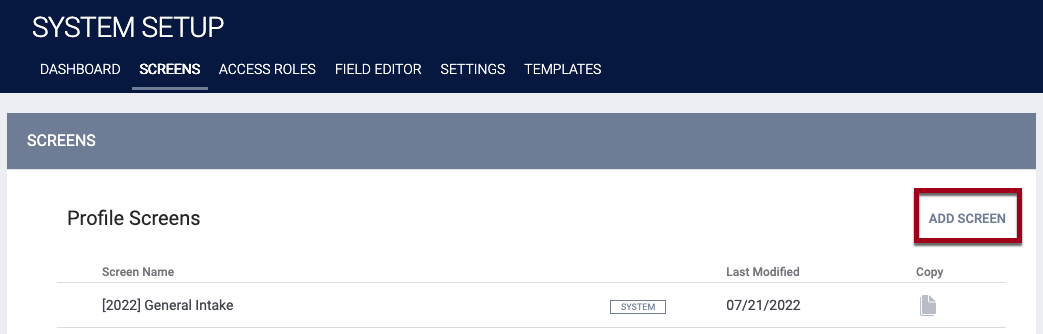
To view existing screens or create a new one, click the Launchpad and navigate to SETUP > SCREENS.
The right-hand sidebar lists the different screen types. For a complete list of screen types, along with details on the function of each type, refer to our Introduction to Screens and Screen Types article.
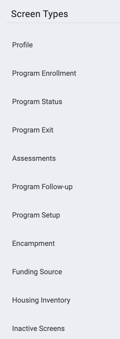
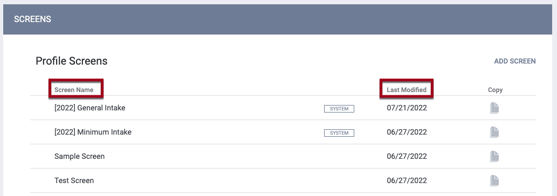
"System" screens will be listed first within each Screen Types section. You can sort the rest of the screens by Screen Name or Last Modified by clicking the column header.
Copying Screens
To create a screen based on an existing screen, click the Copy icon for the existing screen.
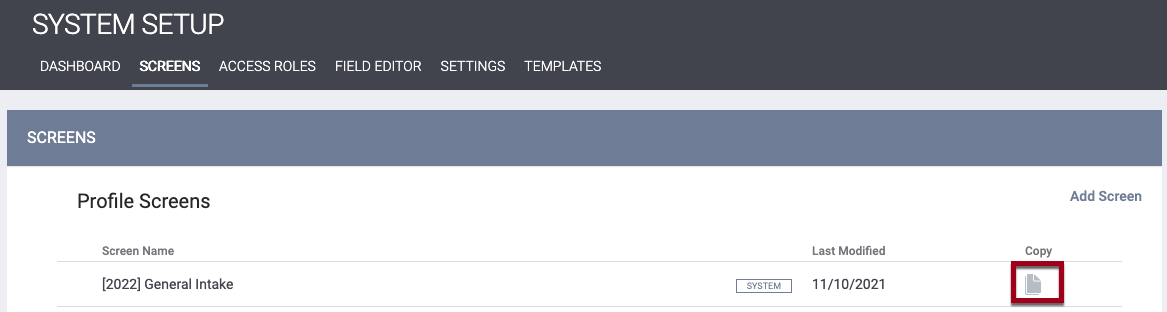
Note: When copying and modifying a screen identified as "System," please check with our Technical Support Team before deleting any fields to avoid incomplete data for federal reporting (if applicable).
Once you click the Copy icon, the copied screen appears in the list of screens for you to edit as needed.
Editing Existing Screens
To modify an existing screen, click the Edit icon next to the screen name.

Note: Edits made to an existing screen will impact all agencies using the screen.
Creating New Screens
To create a new screen, click ADD SCREEN.
The SCREEN EDITOR appears.
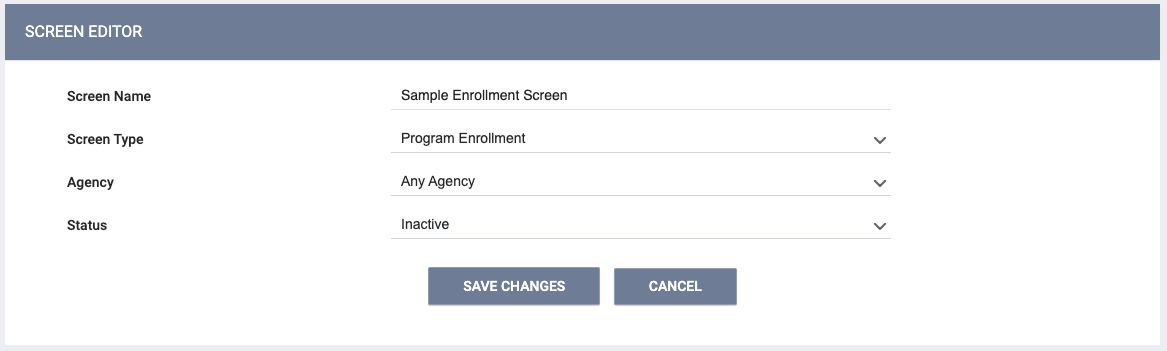
Enter a Screen Name and select the appropriate Screen Type.
Note: Regardless of the Screen Types section you are in when you click ADD SCREEN (Profile, Program Enrollment, etc.), your selection for the Screen Type field determines the section where the screen will be saved.
For the Agency field, select "Any Agency" to make the screen available to all agencies in the system, or select a specific agency from the picklist to limit the screen's use to just that agency.
For the Status field, select "Active" or "Inactive":
- The Active status makes the screen available for use by agencies and in Program Templates.
- The Inactive status allows you to save the screen without making it available. All "Inactive" screens are listed in the Inactive Screens section of the sidebar and grouped according to screen type.
Note: The default selection is "Inactive," so the system will save the screen in the Inactive Screens section unless you set the Status field to "Active."
Encampment Program Toggle
When Outreach is enabled for an instance, the SCREEN EDITOR for Program Setup, Program Enrollment, Program Status, Program Exit, and Program Follow-up screens also includes an Encampment Program toggle. Enable this toggle to indicate that the screen can be used in an encampment template. Refer to our Configuring Encampment Programs article for more information.
Additional Options for Assessments
When you create an Assessment screen, you will see additional configuration options. These options are described at the end of this article.
Click SAVE CHANGES to save the screen.
Structuring the Screen
The various options available for customizing a screen are described below.
Adding New Fields
Note: While configuring screens and fields, please keep in mind that HUD fields are only exposed to align with the HUD Data Collection Stages outlined in the HMIS Data Dictionary in Looker for Data Analysis.
If you already know the field's name, enter it into the Field Library search box in the right-hand toolbar.

You can also enter a keyword (e.g., "Household"). After you click SEARCH, a list of related fields appears. Only fields in the Field Library will appear in the search results. For information on creating custom fields, see Creating and Editing Fields.
Select the Add icon next to the appropriate field to add it to the screen.
Note: The system prompts users to record values for Date of Birth, First Name, Last Name, Social Security Number, and Gender at record creation. The system automatically includes these fields in all Client Profile screens; these fields display in a specific order because some of the fields include field display constraints to assist with data entry. System Administrators cannot add these fields to custom screens. System Administrators can use the live markers Gender and Age to add date-of-birth or gender information to a screen other than the Client Profile.
If a system administrator saves a response for a field in the SCREEN EDITOR (or multiple responses, in the case of a multi-select picklist), the system automatically displays that response in the user interface when a staff member completes the screen. The user can modify the response unless the field is hidden or made read-only.

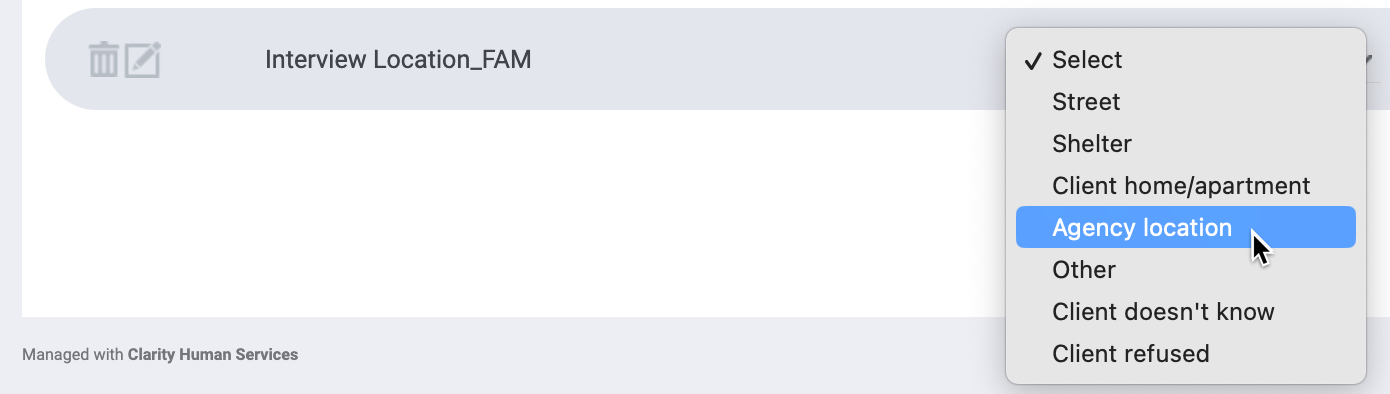
Editing Fields
To edit a field, hover over the field and click the Edit icon. Refer to the Screen Field Editor article for details.

Note: When you modify a field within a screen, those modifications only apply to that particular screen.
If desired, you may select a default response for a field. This selection will auto-populate the field for the user, but the user will be able to select a different response if needed.
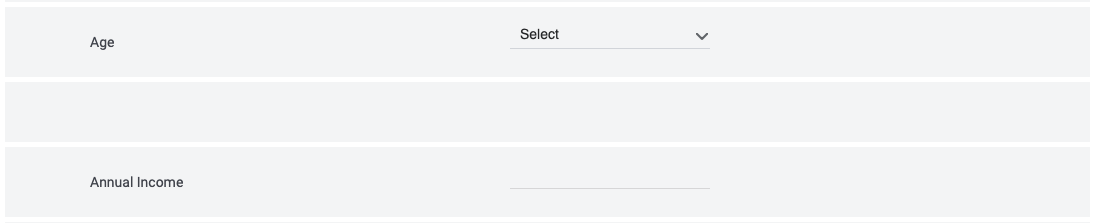
Adding Spaces
Clicking ADD SPACE creates a line to separate fields. When you click ADD SPACE, a blank space appears at the bottom of the screen. You can then click and drag the space to the desired location.

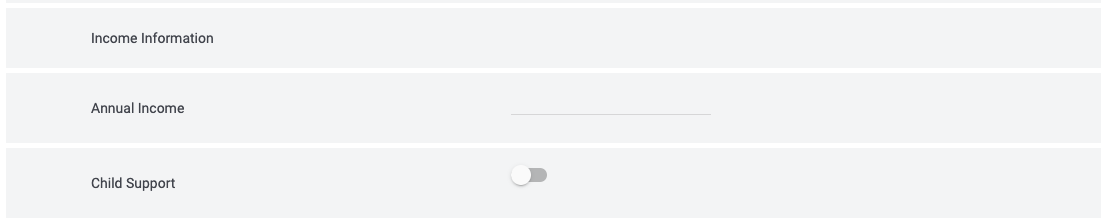
The example below shows a space added between the Age and Annual Income fields.
Adding Labels
A "label" is a heading for a section of fields on a screen, such as the "Income Information" label in the example below.
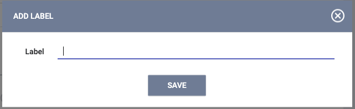
To create a label, click ADD LABEL.

-
The ADD LABEL pop-up appears. Type the desired heading, then click SAVE. A label cannot be more than 255 characters in length.
-
You can edit your label at any time by clicking the Edit icon.
-
You can delete a label by clicking the trash can icon.
Merging Fields
Merging fields in a screen causes two fields to display on the same line in the user interface. To merge fields, click the Merge icon.

The field merges with the field directly above it.
To separate two merged fields, click the Unmerge icon.
Note: System administrators should edit fields before merging them, as merged fields are uneditable.
Adding Warnings
System administrators can add a warning to a screen that displays under all conditions or only displays under certain circumstances.
Note: If you want the warning to display only when certain conditions are met, you must add Display Constraints to the warning.
To add a warning to a screen, click ADD WARNING.

Add the desired text for the warning and click SAVE.
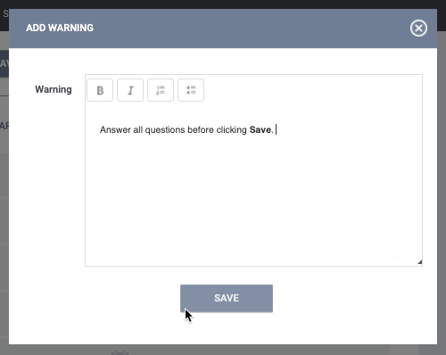
There is a 1000-character limit for the Warning text box. Note that the character limit includes the text's associated HTML in the database. For example, the text "warning" with bold formatting is saved in the database as <p><em><strong>warning</strong></em></p> and is counted as 41 characters.
The saved warning appears in SCREEN EDITOR and can be edited to include Display Constraints. Display Constraints for warnings function in the same manner as they do for fields. When a constraint is added to a warning, the warning only displays when the constraint conditions are met.

Screen Editor Icons Based on Screen Field Editor Settings
The icons listed below represent specific configurations in SCREEN FIELD EDITOR:
| Icon | Configuration |
 |
Display Constraint |
| |
Calculation |
| |
Sensitive Data |
 |
Hide |
 |
Live Marker |
| Warning |
Saving Changes
Once you finish modifying a screen, click SAVE CHANGES.

Note: It's only necessary to click the SAVE CHANGES button to save changes above the horizontal line. The system automatically saves field changes within a screen.
Force Publish
Changes saved to an active screen (adding, removing, or modifying a field, including adding, removing, or modifying constraints or calculations) will be applied to the screen within client records the next time a user accesses the screen. There may be some lag time when the screen is opened for the first time after a change is made.
To publish those changes now so that the user won't have to wait for the changes to be published when they access the screen, click the FORCE PUBLISH link.

Deleting Screens
To delete a screen, hover over the row and click the trash can icon.

Note: You cannot delete screens in use by an active template or agency.
Audit Log
Click the button in the lower right of the SCREEN EDITOR to view the Audit Log.

For System screens, the Audit Log will include the following information:
- The date the screen was created.
- Changes to the field values (Name, Status, all field settings, default field value, etc.).
- Changes due to System screen updates.
- The user who updated the screen.
- The user who published the screen (new or updated).
The Audit Log will not track the times when a user clicks SAVE CHANGES without actually changing anything on the screen. Also, last_updated and ref_user_updated will not be updated, and the green "Changes successfully saved" banner will not appear.
Screen Configurations for AssessmentsThe following options are only available for screens with a Screen Type of "Assessment":
Assessment Processor
The Assessment Processor is a tool that allows an assessment to be scored. Refer to the Assessment Processors article for more information about assessment processors.
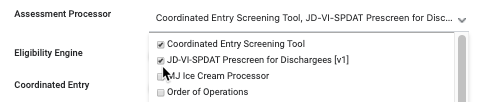
Assigning Multiple Processors to an Assessment
A system administrator can assign more than one Assessment Processor to the same assessment, allowing users to generate multiple scores using one assessment.
The three-dot symbol shown below appears for completed assessments that are associated with multiple processor scores. Click the three dots to display the other scores.
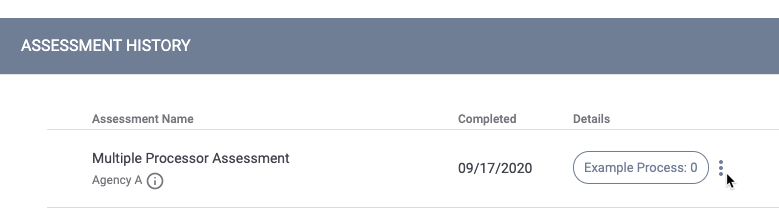
If a user completes an assessment with only one processor assigned to it and later updates the same assessment and a System Administrator assigns an additional processor to it, the system displays the score for the first processor assigned to the screen on the page. If two or more processors are assigned to an assessment when a user first completes it in the client record, the system lists them alphabetically.
Eligibility Engine
Eligibility Engine allows the system to match responses to fields in an assessment against a program's eligibility criteria. After saving an assessment in a client record, the user sees a list of programs the client is eligible for based on the responses to the fields in the assessment.
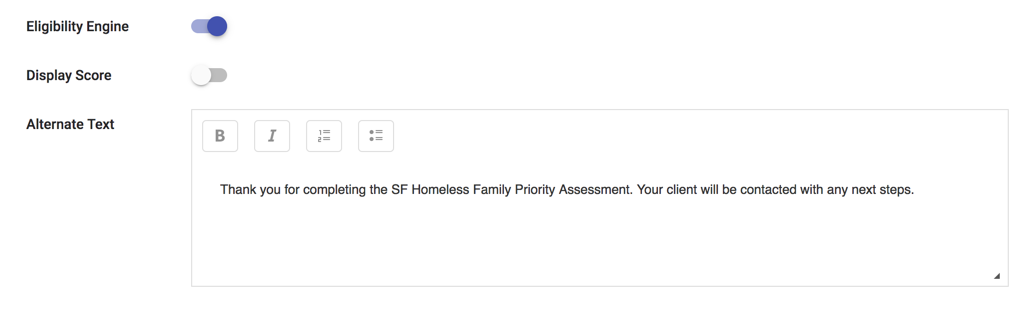
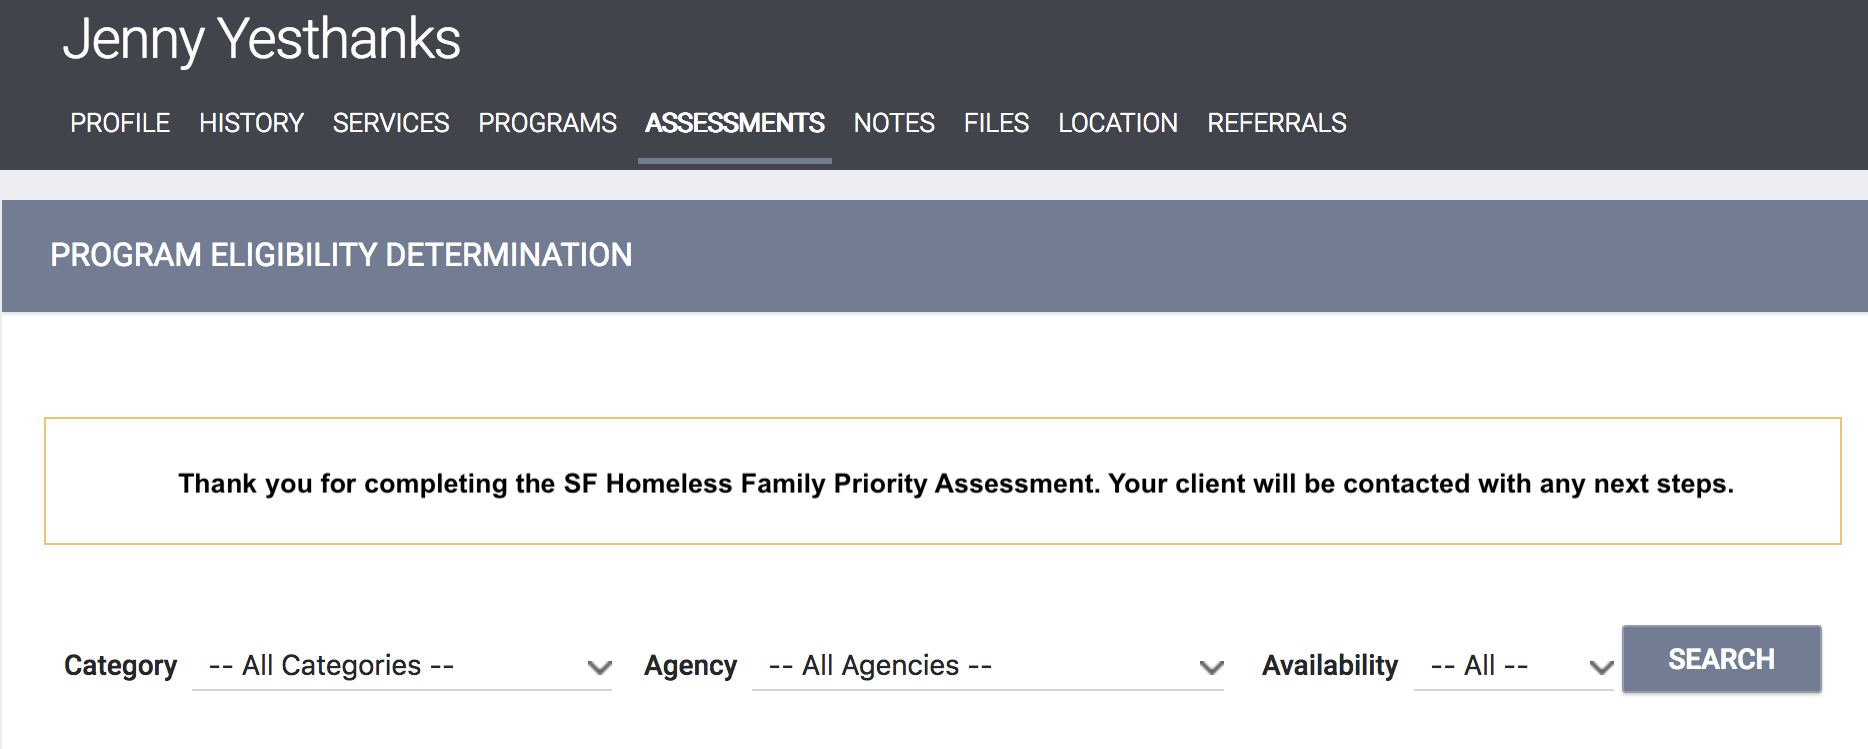
Display Score
The Display Score toggle appears when:
- Eligibility Engine is toggled ON
OR - An Assessment Processor is assigned to the screen

When Display Score is turned ON, the assessment score (if applicable) appears on the screen in the client record.
When Display Score is turned OFF, a text box labeled Alternate Text appears for you to enter text to be displayed on the screen instead of the score.

Users viewing this section will see the alternate text instead of the assessment score.
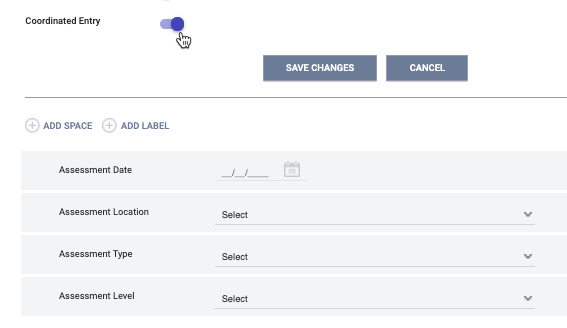
Coordinated Entry
If you turn on the Coordinated Entry setting, the system adds the fields to the screen that collect 4.19 Coordinated Entry Assessment data. Refer to the Coordinated Entry Screens and Templates article for more information about Coordinated Entry screens.
Recent Assessment Warning
When this setting is enabled, the system will display a warning for staff members who attempt to complete an assessment when the same assessment was already completed in the client record within the selected number of days.

The following logic applies to this warning:
- The system only looks at completed, active (not deleted) assessments in the client record.
- The system compares the completed assessment's Assessment Date field against today's date.
- The system looks at both agency and program-level assessments.
- The staff member who saved the assessment can be from a different agency, but the assessment must be shared with the agency.
When all criteria are met, a warning displays in the client record when a staff member clicks START for the assessment that reads: "A recent assessment of this type already exists for this client. Are you sure you wish to create another assessment?"
If the staff member clicks OK, the assessment appears. If they click Cancel, they remain in the Assessments tab.
Updated: 01/30/2024