This article describes how agencies can use the Departments function to set up specific sharing settings for individual programs and/or services within the agency.
Agencies with multiple programs and/or services can use Departmental Sharing to secure each program and/or service independently. (For information on sharing between agencies, refer to Introduction to Sharing Client Data.)
Departmental Sharing enables the System Administrator to regulate viewable records such as program/service history, case notes, and client files. A user within the same agency who is not granted departmental access will not be able to see program/service history for the associated program in the client history, nor will the program appear in the available list of programs in the PROGRAM tab of the client record, even though they are in the same agency. The System Administrator can then assign any combination of departmental data restrictions to users with departmental access.
For example, an agency has two programs: Program A and Program B. A staff member might be associated with Program A but should not be able to have access to Program B. The System Administrator can configure this staff member to not have access to Program B, even though Program B is within the same agency.
Department Sharing blocks (or allows) users to view Services, Programs, Notes, and Files, but all other rights (e.g., deleting) are still controlled by the user's access role.
Configuring Departmental Sharing requires four steps:
- Enable Departmental Sharing
- Create the Department
- Assign the Department to the Program or Service
- Assign staff members to the Department
Enable Departmental Sharing
The first step is to enable Departmental Sharing within the agency. To do this, click the Launchpad, then navigate to MANAGE > SHARING. In the SHARING DEFAULTS section, select "Enabled" in the Departments field. Click SAVE CHANGES.
This will activate Departmental Sharing capabilities for your agency and provide a new AGENCY DEPARTMENTS area on the screen, enabling the user to configure the departments within the agency.
Note: This feature can be disabled at any time. If Departmental Sharing is disabled, all department information will default to the Agency Sharing Defaults.
Creating Departments
The next step is to create the Department(s). Remain in the SHARING screen, scroll down to the AGENCY DEPARTMENTS section, and click ADD A DEPARTMENT.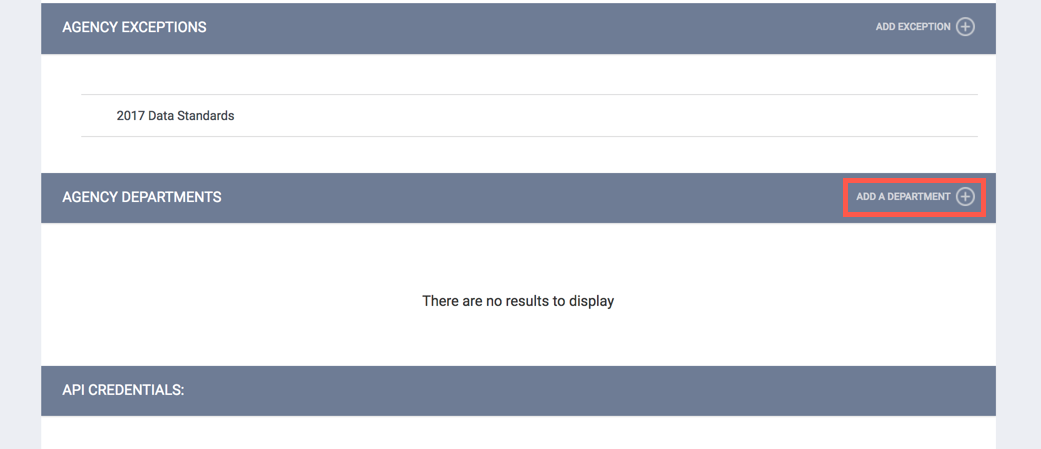
The ADD DEPARTMENT screen appears. Enter a Name for the Department.
If Clients Created in the SHARING DEFAULTS section is set to "Sharing Groups Controlled," you will see a Clients Created field below the Name field.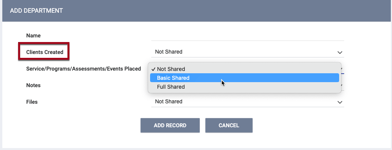
Select one of the following options:
- Not Shared: clients created under this agency by users who belong to this Department will be "Private" clients who are only viewable by users within this agency.
- Sharing Groups Controlled: clients created under this agency by users who belong to this Department will be "Public" clients, the ability for other users to view them is subject to the Sharing Group's Clients Created setting.
- System Shared: clients created under this agency by users who belong to this Department will be "Public" clients are viewable to users from other agencies.
Next, configure the sharing settings for the following categories:
- Service/Programs/Assessments/Events Placed
- Notes
- Files
These sharing settings apply to any user that is not assigned to the Department. You can configure Agency Exceptions to allow specific sharing settings for certain Agencies or Departments, as discussed below.
System Administrators can assign one of three sharing settings to create any sharing configuration necessary for each category.
- Full Shared: End users outside of the Department will have full access to the category (i.e., Service/Programs Places, Case Notes, or Files). They will be able to view and edit (depending on the user's access role) all client information associated with the specified category.
- Basic Shared: End users outside of the Department will be able to see that the information in the specified category exists but will not be able to view the details of the Services, Programs, Case Notes, or Files.
- Not Shared: End users outside the Department will not be able to see any information related to the specified category.
Click ADD RECORD when you are done. The MODIFY DEPARTMENT page appears.
Department Exceptions
The Department Exceptions work the same way as general Agency Exceptions. They allow a particular agency or department within an agency to have sharing settings that differ from the Department settings.
To add a Department Exception, click ADD EXCEPTION in the DEPARTMENT EXCEPTIONS section of the MODIFY DEPARTMENT page. Then select the Agency, Department (if applicable), and the specific sharing settings for each category, then click ADD RECORD.
Assigning Departments
After configuring the share settings for the new department, the next step is to link the Department to a Program or Service. The process is similar for both.
Assigning a Department to a Program
To assign a department to a program, click the Launchpad icon and navigate to MANAGE > PROGRAMS. Click the Edit icon for the desired Program.
On the MODIFY PROGRAM page, click Departments in the Program Resources sidebar. Select ADD DEPARTMENT. A pop-up box will appear. Select the Department from the drop-down list and then click ADD to link the Department to the program.
Any changes resulting from adding or modifying a Department to a program will apply to all relevant client enrollment records. Additionally, historical records with Department information will be updated.
Assigning a Department to a Service
To assign a department to a Service, click the Launchpad icon and navigate to MANAGE > SERVICES. Click the Edit icon next to the desired Service.
On the SERVICES: DETAIL page, click ADD DEPARTMENT in the DEPARTMENT section. A pop-up box will appear. Select the department from the drop-down list and click ADD.

When a department is connected to a service (or removed), it will apply retroactively to services provided to clients. Additionally, historical client service records, where the service has a connected Department, will be updated.
Assign Staff Members to Departments
The final step in configuring Departmental Sharing is to assign staff members to the department. Staff members can be added/removed from the department access list at any time.
Note: Staff members can only belong to one department at a time.
To assign a staff member to a department, click the Launchpad, navigate to MANAGE > STAFF, and select the Edit link to the left of the staff member's name.
On the MODIFY THE STAFF page, scroll down to the DEPARTMENTS section and click ADD DEPARTMENT.
Select the department from the drop-down list and then click ASSIGN. Now the staff member has access to the programs and services linked to the Department.
Modifying a Department
Users with the appropriate permissions can hover over the Department to display the trash can and Edit icons.

Editing
Click the Edit icon. The MODIFY DEPARTMENT page appears. Edit as needed, then click SAVE CHANGES.
Within the MODIFY DEPARTMENT page, users may also edit/delete Department Exceptions.
Note: If you click SAVE CHANGES on the MODIFY DEPARTMENT page or MODIFY DEPARTMENT EXCEPTION page without making any changes, the system will not display the green "Changes successfully saved" banner and will not update last_updated and ref_user_updated.
Deleting
Click the trash can icon to delete the Department.
Updated: 7/31/2023