This article explains the options available within Referral Settings for customizing the configuration of each Community Queue.
Community Queues provide communities with the tools to triage and prioritize client referrals across programs, agencies, and systems of care. Community Queues are highly customizable and can be adapted to a range of local processes and approaches to Coordinated Entry as well as other systems of resource connection.
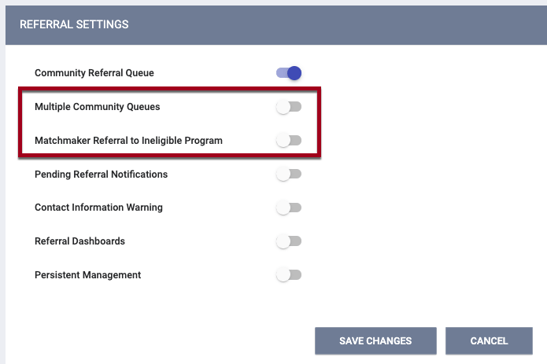
To allow users to refer clients to a Community Queue, system administrators must enable Community Referral Queue in Referral Settings. Once you enable this setting, the system displays several additional configuration options.
Note:
- Only system administrators can access and edit Community Queue settings.
- Changing most Community Queue settings will affect all existing records that meet the new conditions for that setting (for example, changing the Inactive Referral Expiration Threshold from "None" to "90 Days" will expire any referrals with 90 days of inactivity).
- While agencies can use a Community Queue for purposes other than Coordinated Entry, to comply with the HUD HMIS Data Standards, they must use a Community Queue with specific configurations in place. For more information on Community Queue configuration for Coordinated Entry, see Coordinated Entry Checklist.
Please refer to Community Queue for End Users for details on using the Community Queue at the end-user level.
To enable Community Queues, click the launchpad, navigate to SETUP > SETTINGS, then click Referral Settings in the Advanced Options sidebar.
Click the edit icon next to the Referral Settings you would like to configure (there may be more than one if system administrators set up multiple Referral Settings).

Toggle on Community Referral Queue.

Two additional settings appear for you to enable as appropriate:
- Multiple Community Queues
- Enabling this setting allows users to select from different queues and refer a client to more than one queue during the referral process. Multiple Community Queues can manage distinct channels for connecting clients to different resource types or allow separate entities to handle specific triaging operations.
- A user switching between agencies whose Referral Settings have this setting enabled can refer a client to more than one Community Queue across multiple sharing groups, regardless of whether each sharing group has multiple queues.
Note: If Coordinated Entry Type is set to “Sharing Groups Based,” any queues that you want to be visible on the Community Queue tab will need to be added to the Referral Settings for the Primary Coordinated Entry Group.
- Matchmaker Referral to Ineligible Program
- When this setting is enabled, users with Referral Match Maker enabled in their Access Role can create a referral to a program a client is ineligible for from an assessment with Eligibility Engine enabled.
Click SAVE CHANGES.
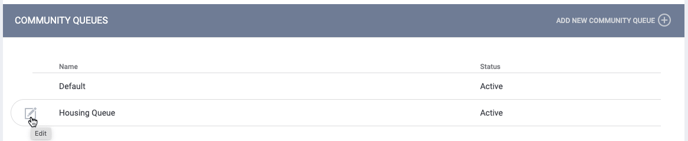
A COMMUNITY QUEUES section with a default queue will appear.

You can rename a queue, but you cannot delete it. Communities using Multiple Community Queues will see the additional queues displayed here.
Whether a community is using a single queue or multiple queues, system administrators configure the remaining Community Queue settings within the COMMUNITY QUEUES section. To edit a queue, click the edit icon next to the queue.
The MODIFY COMMUNITY QUEUE page appears.
The following settings apply to all Community Queue referrals (system administrators configure the remaining settings at the individual queue level):
Status: this setting allows you to mark a Community Queue as “Active” or “Inactive.” The default setting is “Active.”

Changing the status of a Community Queue from “Active” to “Inactive” results in the following:
- You will see this pop-up message:
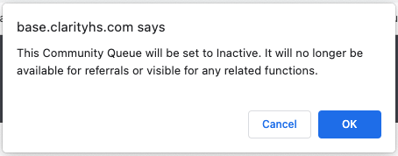
- Users will not be able to send referrals to the queue.
- The queue will not appear on the Referrals tab, the Availability tab, or the Unit Queue.
- You will not be able to connect the queue to a program. If the queue was connected to a program before being switched to “Inactive,” the queue still appears but is flagged as “Inactive.”
- Any custom Program Availability fields created for the queue will not appear on the ADD AN OPENING/ADD OPENINGS window on the Availability tab.
- Referrals that were manually expired or denied before the queue was switched to “Inactive” cannot be sent back to the queue.
- Deleted referrals associated with an inactive queue cannot be restored as long as the queue remains inactive.
- You will still be able to delete the queue as long as it does not have referrals associated with it.
At least one Community Queue must always be active. If you try to select “Inactive” for the only active queue, you will see the pop-up message below, and you will not be able to save the update.

Allow Referral to Community Queue: Turning this setting on enables system administrators to define which assessments staff members can use for referring clients to the queue. If this setting is turned off, users can’t refer to the queue from PROGRAM ELIGIBILITY DETERMINATION within the (client or program-level) ASSESSMENTS tab.
If sending the referral to a Community Queue during the denial process, users can select a queue with Allow Referral to Community Queue toggled off. See the “Sending a Denied Referral to a Community Queue” section of Updating the Status of a Referral for more information.
If Allow Referral to Community Queue is enabled, the ASSESSMENTS section displays. To add assessments, click ADD ASSESSMENT.
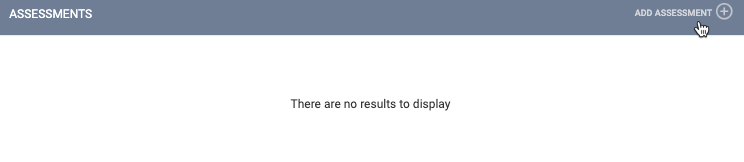 In the ADD ASSESSMENT pop-up, you will see a list of all available Assessment Screens. Select the assessment(s) you would like staff members to use when referring to the community queue.
Note: The assessment must also have Eligibility Engine enabled and be available to the agency or program to refer the client to the queue from the Assessments tab.
Allow Moving to Queue: if this setting is enabled, you can move a referral to a different Community Queue within the same Referral Setting while maintaining all of the referral’s history (original referrer, length of time on queue, etc.). The function will be provided via a MOVE TO ANOTHER QUEUE section on the REFERRALS tab if all of the following are true:
- Multiple Community Queues have been configured under SETUP > SETTINGS > Referral Settings.
- The Allow Moving to Queue setting on the MODIFY COMMUNITY QUEUE page is turned on.
- The Referrals - Community Queue Access Right is enabled for the user.
- The Referrals - Move Referral Access Right is enabled for the user. This setting is dependent on Referrals - Community Queue.
To move a referral, select a Community Queue from the picklist and click SAVE CHANGES.
- The picklist will not include the current Community Queue.
- You will not be able to move a referral to a Community Queue where the client already has a referral.
Automated removal from the Community Queue: When this setting is enabled, a program exit to a permanent destination will trigger an automatic update to a Community Queue referral’s Remove from Queue section. Upon program exit, a confirmation pop-up message alerts the user that the client will be removed from the Community Queue. The system records a response of “Self Resolved” for the Reason for Removal field. This feature is tied directly to Enabled Automated Functions within System Setup: Settings.
Prioritization List: When this setting is enabled, the system records a value of “1” (“Placed on Prioritization List”) for program-level Coordinated Entry Assessments that are referred to the queue. For more information, see Prioritization Status.
Community Referral Threshold: This setting allows you to select how long the system will wait before sending a referral back to the Community Queue tab from the Pending tab. The default setting for a new Community Queue is “None.” System administrators can set the threshold between 1 and 720 days.
Display Option to “Send to Queue” at Denial or Expiration: This setting controls what type of referrals a user can send to a Community Queue when changing the status of a referral to “Denied” or “Expired.” These options are as follows:
- Qualified Referrals: referrals made from the Assessments tab
- Unqualified Referrals: referrals not previously sent to a Community Queue
- Reassigned Referrals: referrals reassigned to a program from a Community Queue
- Qualified and Reassigned Referrals: referrals made from the Assessments tab and referrals reassigned to a program from a Community Queue
- All Referrals: all referrals
- No Referrals: no referrals
Inactive Referral Expiration Threshold: This setting designates how long the system allows a referral to remain in the Community Queue with no client activity (referral сheck-in, services, assessments, program enrollments, status assessments, program exits, program notes, referral notes, or Coordinated Entry Events). The default setting for a new Community Queue is “None.” System administrators can set the threshold between 1 and 720 days. Once a client meets the Inactive Referral Expiration Threshold, the system automatically changes the referral status to “Expired” and moves it to the Denied tab.
Matching Process: this setting defines whether staff members designated as matchmakers (assigned by Access Role) can reassign Community Queue referrals to agencies other than their own. There are three available settings:
- Agency Controlled: Users can only reassign referrals to programs within their agency.
- If you select “Agency Controlled,” the Agency Limit field will appear.
- Select a value from the Agency Limit picklist to designate the number of eligible clients that will be displayed when the Community Queue is searched. (If you select “None,” there will be no limit on the number of clients shown.)
- A referral that is reassigned and denied will be filtered out of future search results (unless a new referral to the Community Queue is made for that client).
- Match Maker Controlled: only staff members with Referral Match Maker enabled in their Access Role can reassign referrals, and they have access to reassign to other agencies’ programs. Users without Referral Match Maker permissions cannot reassign referrals, even to programs within their own agency.
- Both: Staff members with Referral Match Maker enabled in their Access Role can reassign referrals to other agencies’ programs. Staff members who don’t have Referral Match Maker enabled can only assign clients to their agency programs.
Note: When Matching Process = “Match Maker Controlled,” the REASSIGN section of a referral will be hidden for users viewing a referral from the client History tab who do not have the Referral Match Maker access permission.
Program Availability Management: toggling on this setting enables two functions:
- Enables the Availability tab to appear under the Global REFERRALS tab. Enabling this setting allows users to view program availability. Users can set program availability to FULL AVAILABILITY, LIMITED AVAILABILITY, or NO AVAILABILITY. With LIMITED AVAILABILITY, users can add or delete openings for the program.
- Displays a drop-down list of programs in the REASSIGN section of the REFERRAL: ASSIGN page. Matchmakers reassign a client to a program in this list based on their assessment score and other criteria.
Notes:
- For a program to be listed in the REASSIGN drop-down, either the FULL AVAILABILITY or LIMITED AVAILABILITY option must be selected for that program in the Availability tab. If NO AVAILABILITY is selected, the program will not appear in the drop-down.
-
If Bed and Unit Management is set to “Required” or “Optional” for the Referral Setting, the Program Availability Management toggle will be set to ON and read-only.
Use Most Recent Assessment: toggling on this setting displays an Update Historic Data link if the assessment that was used to refer the client to the Community Queue has been completed again, resulting in a new score. Click the Update Historic Data link to update referrals in the Community Queue to that recently completed assessment, regardless of whether a user saved the assessment before or after “Use Most Recent Assessment” was enabled.
Note: Toggling on Use Most Recent Assessment is not the only step required for updating the referrals; you must also click the Update Historic Data link when it is displayed.
Community Queue Snooze: permits users to temporarily move a referral from the Community Queue to the Snoozed tab by picking a “Snooze Until” date. After the designated date, the referral will return to the Community Queue tab.
Use Custom Fields on Program Availability: this setting, which is visible when the Bed & Unit Management picklist is set to "Disabled," allows system administrators to configure custom fields for posting program availability openings in the Availability tab. When this setting is enabled, the PROGRAM AVAILABILITY CUSTOM FIELDS section appears at the bottom of the MODIFY COMMUNITY QUEUE page. System administrators can add custom fields by clicking ADD NEW CUSTOM FIELD.
Note: The first character of the custom field Name must be a lowercase letter. The custom field Name can only contain lowercase letters, numbers, and underscores.
Audit Log
Users with the appropriate access may click the Audit Log button at the bottom of the MODIFY COMMUNITY QUEUE page to track the following changes:
- A user clicking the Update Historic Data link next to the “Use Most Recent Assessment” toggle
- A user adding/deleting from the following sections:

Updated: 01/05/2024