This article outlines recommendations and best practices for configuring the INVENTORY functionality within Clarity Human Services.
What is INVENTORY?
INVENTORY is an inventory management tool built into Clarity Human Services that allows more granular tracking of a community’s housing stock, including Sites, Buildings, Unit Configuration Types, Units, and Beds. INVENTORY provides dynamic tracking for real-time updates of availability, status, and capacity. Eligibility criteria can be used throughout the levels of INVENTORY, allowing for client matching in a more detailed way.
INVENTORY is complex; setting it up for the first time can be tricky. Significant planning and decision-making must be completed before beginning the journey. This article outlines some recommendations and best practices to make the process less intimidating.
Can INVENTORY Be Used for All Project Types?
INVENTORY is designed to be used for residential project types, which are those that provide shelter and housing assistance to clients. The following project types are not included in the INVENTORY model:
- Services Only
- Street Outreach
- Other
- Coordinated Entry
- Day Shelter
- Homeless Prevention
Sites
In INVENTORY, a “Site” is a Housing Inventory Site that collects location and site-type information about an entity that contains Buildings, Units, and/or Beds. A Housing Inventory Site is different from an Administrative Site, which collects contact information associated with a project. To configure INVENTORY Sites, be sure to select Housing Inventory in the sidebar under MANAGE > SITES.
Your selection for the Site Type field on the ADD NEW HOUSING INVENTORY SITE screen should accurately represent the program type and physical composition of the Units and Buildings.
The options for Site Types are as follows:
| Site Type | Definition |
| Single Site: Single Building | Single project facility. |
| Single Site: Multiple Buildings | Clients are housed in project facilities in multiple locations, and more than one client is housed in each project facility. |
| Scattered Site: Multiple Buildings | Clients have leases or other occupancy agreements and are housed in residences that are not owned by the project. |
| Standalone Unit | An individual Unit not located in a facility owned by a project. |
Scattered Site Units
A Site is considered to be “Scattered” if it has Units located in multiple Buildings across project facilities, is associated with tenant-based vouchers, or has dedicated Units across Buildings that are not owned by a project.
The two Site Type options that apply to Scattered Sites are “Scattered Site: Multiple Buildings” and “Standalone Unit”:
- For Units spread across dedicated Buildings, the most common configuration is selecting “Scattered Site: Multiple Buildings” and setting up a single Site with multiple Buildings nested underneath it.
- For tenant-based vouchers or rental assistance where clients find their own residences, select “Standalone Unit.” This option eliminates the need to set up a Building.
RRH Programs
RRH programs are unique because there is no physical Unit, and clients find their own residence. As mentioned above, we recommend choosing “Standalone Unit” as the Site Type. When configuring the Units for RRH Sites, consider thinking of the Units as program openings instead of physical Units. Communities can use general naming conventions for each Unit; for example, Program Opening #1, Program Opening #2, etc.
While setting up RRH Programs, please refer to the address setup guidelines for RRH Programs in the HMIS Data Standards Manual.
Buildings
INVENTORY Buildings are physical structures set up under Sites that represent actual, physical Buildings, even if only one Unit or Bed in the Building applies to the inventory. Sites can have one Building, multiple Buildings, or -- in the case of Standalone Units -- no Buildings.
Buildings may be located at the same address as the Site or have a unique address.
Unit Configuration Types
A Unit Configuration Type (UCT) is a template that can be applied to Units. The Unit Configuration captures the HUD data element 2.07 bed and unit information. UCTs are set up under each Site.
UCT Naming Conventions
Because large communities may have hundreds of Sites, we recommend establishing a naming convention for UCTs that promotes consistency across all Sites. Examples of standard naming conventions are listed below.
| Housing Type | Naming Convention Example | UCT Name Example |
| Housing | Population + Unit Size | Adult-1 Bedroom |
| Housing | Population + Unit Size + Funding | Family-2 Bedroom-CoC |
| Shelter | Bed Type + Shelter Type | Upper Bunk-Congregate |
| Shelter | Population + Bed/Room Type | Adult-Private Room |
Bed Counts
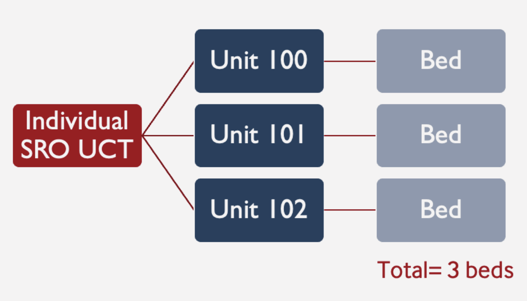
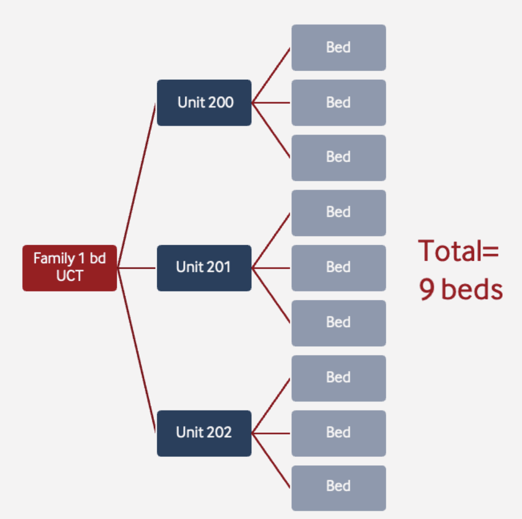
The bed count listed in each UCT should represent the total number of Beds in a single Unit, not the total number of Beds in the program. Because the same UCT can be applied to multiple Units, the bed count acts as a multiplier that increases the program’s bed count each time it’s applied to a Unit.
The following examples show how Unit counts are totaled as UCTs are applied to Units.
Single Adult Unit Configuration Type
Family Unit Configuration Type
Unit Attributes
A Unit reflects an actual, physical Unit within a building. Recording Unit attribute information using INVENTORY provides a level of granularity that allows matchmakers to refine their process to match clients to Units that meet their needs.
You can create custom fields to capture any relevant attributes of the Unit, such as whether it is ADA compliant, has air conditioning, allows pets, etc. The best practice is to add the custom fields to either the UCT or Unit screen:
- Since a UCT is a template, you can indicate specific Unit attributes that apply to multiple Units, and then connect that UCT to all applicable units. This approach eliminates the need to indicate Unit attributes on each Unit’s screen.
- However, if the Unit attributes in a Building or Site tend to change over time, you would need to create a large number of UCTs or very long UCT naming conventions to manage the various iterations. In this case, consider collecting Unit attributes at the Unit level.
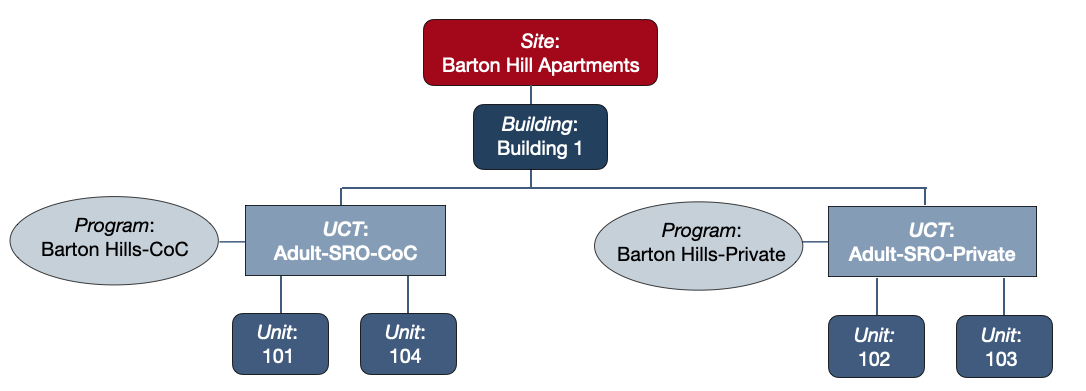
Connecting Programs to INVENTORY
As you begin mapping out the configuration for INVENTORY, you need to determine what programs will be connected to each Site. You must also decide whether each program should be connected at the Site, Building, or Unit Configuration level. The best practice is to use a consistent method across all Sites.
Programs should only be connected to the Site or the Building if 100% of all Units within the Site or Building are used by the same program.
Connecting programs to a UCT provides the most flexibility, allowing Units to switch between funding sources or programs if needed. For example, a Building may house more than one program, resulting in the need to move Units between programs. If you assign the program to the UCT, you can change the program connection by simply changing the UCT associated with the Unit.
Where Do I Attach Eligibility?
Where Do I Attach Funding Sources?
Can I Use the Unit Queue and Limited Availability Simultaneously?
- To apply Bed & Unit Management to all programs in the Referral Setting, set the Bed & Unit Management picklist in Referral Settings to “Required.” The ability to post program openings will be disabled system-wide.
- To allow all programs in the Referral Setting to post program openings, set the Bed & Unit Management picklist in Referral Settings to “Disabled.” The Unit Queue will not be displayed.
- To enable some programs to allow referrals to program openings and enable other programs to use the Bed & Unit Management functionality:
- Set the Bed & Unit Management picklist in Referral Settings to “Optional.”
- Set the program-level Bed & Unit Management toggle to ON for the programs that will use Bed & Unit Management; set the toggle to OFF for the programs that will use program openings.
Updated: 01/24/2024